Saturday, May 17, 2025

Jenkins part6

Jenkins part6

Class 26th Jenkins May 17th
Jenkins Master-slave(Controller-Agent) setup
Post Build actions 
What are Artifact ?
Configure Artifacts on Nexus and S3 - practical
                                           Jenkins Master-slave(Controller-Agent) setup
A Jenkins Master-slave setup (now called controller-agent)is used to distribute build and deployment tasks across multiple machines, improving efficiency  and scalability 
This setup is ideal for running parallel builds, handling large workloads and using environments for testing . (We have multiples instead doing in one instance do it in multiple instance or environments)
Key components 
 Jenkins Master (controller)
.The Main Jenkins server that manages jobs, configurations ,users and plugin management 
.Assigns build jobs to slaves(agents) based on labels and resource availability
.Stores build history and manages scheduling 
 Jenkins Slave(agent) 
.A separate machine that executes build tasks assigned by the master.
.Can run on different OS(Linux,Windows,macOS)
.Can have specific tools Installed (java,Node.Js,Docker,etc)
.Communicates with the master via SSH,JNLP or Cloud-based connectors

So fat we have done 
Git clone code from server
Through mvn installed the build and launch application using jar

Now we implement slave ,We can setup pipeline in controller ( i.e crete job) and build is done in Slave 
For that we need setup node where we want build the setup 
                                                Controller Agent and Slave Creation steps 

Step1: Already i have created on instance Controller, Now we launch one more instances as agent 
While create instance take amazon Linux kernel version 5.10 only 
 Agent Machine (Java runtime /Git need to install)

This is Control Agent server (For already installed these all software's please reference below blog Jenkins 

Controller
https://oracleask.blogspot.com/2025/05/jenkins.html
[root@ip-10-0-0-6 ~]# hostnamectl set-hostname controller
[root@ip-10-0-0-6 ~]# exit
logout
[ec2-user@ip-10-0-0-6 ~]$ sudo -i
[root@controller ~]#

We have created Two Agent Servers Just identification changed hostname ,
and need to installed  java 

Agent1
[root@ip-10-0-3-147 ~]# hostnamectl set-hostname Agent1
[root@ip-10-0-3-147 ~]# hostname
Agent1
[ec2-user@agent1 ~]$ exit
logout
[ec2-user@agent1 ~]$ sudo -i
[ec2-user@agent1 ~]$yum install -y java-17-amazon-corretto-devel
[ec2-user@agent1 ~]$yum install -y git
Agent2
[root@ip-10-0-1-157 ~]# hostnamectl set-hostname Agent2
[root@ip-10-0-1-157 ~]# exit
logout
[ec2-user@ip-10-0-1-157 ~]$ sudo -i
[root@agent2 ~]#
[root@agent2 ~]$yum install -y java-17-amazon-corretto-devel
[root@agent2 ~]$yum install -y git


Step2:  Need to Setup the node in Controller server Jenkins portal
Dashboard>Manage Jenkins >nodes 

Node Name :Agent1
Select Permanent Agent Click create

Number of executors (here Number Current request came simultaneously, we can mentioned how many need perform in the node based on server configuration it will depend) :1
Remote root directory (here we need give the specific path to where git clone and jar file creation of the project): /home/ec2-user/jenkins  
Label: (it is very important it connect between node and job)ccitlabel
Usage: Select :Only build jobs with label expressions matching this node
Launch method Select : Launch agents SSH
 Host Need to give Agent1 Private Ip address: 10.0.1.61
We can give credential click here System add domain one way 


or Another way   >Manage Jenkins >credentials > click add system
    Click Global credentials >Click add credentials

Step3: As of now followed one way both are same final credential stored in globally above click add domain ,Below agent key pem


Select Enter directly give you .pem file of the agent1 key click add 
See Final added credentials 

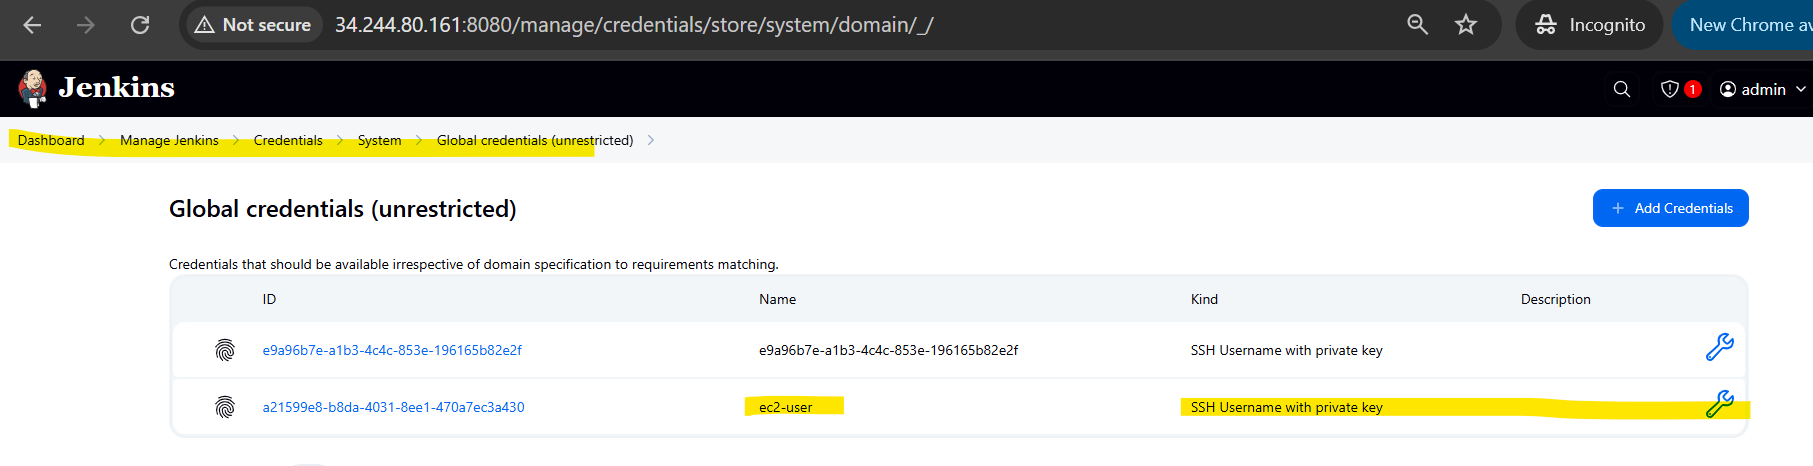
Select Credentials ec2-user and click save

See here below Agent1 initially it showing launch ,after launch getting any error that means your not installed java in you agent machine, just installed relaunch  0/1 number of concurrent executions

Step4: Create Job Newitem > name ccitjob select  Freestyle Project >click Ok
New option came  in General  Restrict where you project can be run ,this option will come only
when Node creation code after only ,give label name ccitlabel1 same name  at time of  node creation.
Git https Url need to specify

Another window just configure the Mvn click save 

Select mvn which you added configuration and enter command clean package and click save 

Job Created Successfully and click Build

Build Failed with git issue 
./master to change to ./main Build again,now Build success

Step5: See below agent1 Workspace created 
[root@ip-10-0-1-64 run]# cd  /home/ec2-user/jenkins
[root@ip-10-0-1-64 jenkins]# ls
remoting  remoting.jar  tools  workspace
[root@ip-10-0-1-64 jenkins]# ls -lrt
total 1368
-rw-rw-r-- 1 ec2-user ec2-user 1396936 May 20 14:15 remoting.jar
drwxrwxr-x 4 ec2-user ec2-user      34 May 20 14:15 remoting
drwxrwxr-x 4 ec2-user ec2-user      40 May 20 14:54 workspace
drwxrwxr-x 3 ec2-user ec2-user      50 May 20 14:54 tools
[root@ip-10-0-1-64 jenkins]# cd workspace
[root@ip-10-0-1-64 workspace]# ls
ccitjob  ccitjob@tmp
[root@ip-10-0-1-64 workspace]# ls -rlt
total 0
drwxrwxr-x 2 ec2-user ec2-user  6 May 20 14:54 ccitjob@tmp
drwxrwxr-x 5 ec2-user ec2-user 58 May 20 14:54 ccitjob
[root@ip-10-0-1-64 ccitjob]# ls
pom.xml  src  target
[root@ip-10-0-1-64 ccitjob]# cd target
[root@ip-10-0-1-64 target]# ls
ccit-0.0.1.jar  ccit-0.0.1.jar.original  classes  generated-sources  maven-archiver  maven-status
[root@ip-10-0-1-64 target]# ls -lrt
total 19660
drwxrwxr-x 3 ec2-user ec2-user       25 May 20 14:54 generated-sources
drwxrwxr-x 3 ec2-user ec2-user       35 May 20 14:54 maven-status
drwxrwxr-x 4 ec2-user ec2-user       34 May 20 14:54 classes
drwxrwxr-x 2 ec2-user ec2-user       28 May 20 14:54 maven-archiver
-rw-rw-r-- 1 ec2-user ec2-user     3706 May 20 14:54 ccit-0.0.1.jar.original
-rw-rw-r-- 1 ec2-user ec2-user 20125842 May 20 14:54 ccit-0.0.1.jar

Step6: Create one more node agent2, you just copy existing node 
Click agent2 instance private ip and security key click save ,Same label ccitlable1 added another Credential added description some name original first for differencation select save

Two Agent  successfully configurations

Build the job Successfully completed 

.jat create target folder
[ec2-user@ip-10-0-1-207 ccitjob]$ cd target
[ec2-user@ip-10-0-1-207 target]$ ls
ccit-0.0.1.jar  ccit-0.0.1.jar.original  classes  generated-sources  maven-archiver  maven-status

Artifacts are created  target folder first if you delete the  workspace try to rebuild it will not created
Because  free style Node multi node will not support 

[ec2-user@ip-10-0-1-207 target]$ ls -lrt
total 19660
drwxrwxr-x 3 ec2-user ec2-user       25 May 20 20:03 generated-sources
drwxrwxr-x 3 ec2-user ec2-user       35 May 20 20:03 maven-status
drwxrwxr-x 4 ec2-user ec2-user       34 May 20 20:03 classes
drwxrwxr-x 2 ec2-user ec2-user       28 May 20 20:03 maven-archiver
-rw-rw-r-- 1 ec2-user ec2-user     3706 May 20 20:03 ccit-0.0.1.jar.original
-rw-rw-r-- 1 ec2-user ec2-user 20125842 May 20 20:03 ccit-0.0.1.jar
[ec2-user@ip-10-0-1-207 target]$ pwd
/home/ec2-user/jenkins/workspace/ccitjob/target

--Build success but workspace target folder not create, due to free style mutiple nodes not supported 
for the overcome instead of Freestyle create job select pipeline
[ec2-user@ip-10-0-1-64 jenkins]$ ls -lrt
total 1368
-rw-rw-r-- 1 ec2-user ec2-user 1396936 May 20 14:15 remoting.jar
drwxrwxr-x 4 ec2-user ec2-user      34 May 20 14:15 remoting

Step7:  Piple line Creating new job click ok

Freestyle we will do all user inface, pipeline we will Groovy  script 

pipeline {
    agent {label 'ccitlabel1'}
    tools {
        maven 'ccit-mvn'
    }
    stages {
        stage('Clone') {
            steps {
                git branch: 'main', url: 'https://github.com/Vakatisubbu/ccit-javaapp.git'
             }
        }
        stage('Build') {
            steps {
                sh "mvn clean package"
                }
        }
    }
}


click Build the job ,job Success i have done Single time ,so that is the reason agent2 only 
build done

Step8: Single time ,so that is the reason agent2 only build done,if you we execute paralled multiple time it build both the agent1 agent2 server ,please build multiple time now 

[ec2-user@ip-10-0-1-207 workspace]$ ls -lrt
total 0
drwxrwxr-x 2 ec2-user ec2-user  6 May 20 20:15 ccitjob@tmp
drwxrwxr-x 5 ec2-user ec2-user 58 May 20 20:16 ccitjob
drwxrwxr-x 5 ec2-user ec2-user 58 May 20 21:05 ccitjob-pipeline
drwxrwxr-x 2 ec2-user ec2-user  6 May 20 21:06 ccitjob-pipeline@tmp
[ec2-user@ip-10-0-1-207 workspace]$ pwd
/home/ec2-user/jenkins/workspace
multiple time executed screen below 


See below Same time frame artifices created both are serves ,which mean above build while you do multiple, the pipeline though we will build multiple agents or server same time.

Agent 1

[ec2-user@ip-10-0-1-64 jenkins]$ ls -lrt
total 1368
-rw-rw-r-- 1 ec2-user ec2-user 1396936 May 20 14:15 remoting.jar
drwxrwxr-x 4 ec2-user ec2-user      34 May 20 14:15 remoting
drwxrwxr-x 3 ec2-user ec2-user      50 May 20 21:15 tools
drwxrwxr-x 3 ec2-user ec2-user      26 May 20 21:15 caches
drwxrwxr-x 4 ec2-user ec2-user      58 May 20 21:15 workspace
[ec2-user@ip-10-0-1-64 jenkins]$ cd workspace
[ec2-user@ip-10-0-1-64 workspace]$ ls
ccitjob-pipeline  ccitjob-pipeline@tmp
[ec2-user@ip-10-0-1-64 workspace]$ ls -lrt
total 0
drwxrwxr-x 5 ec2-user ec2-user 58 May 20 21:15 ccitjob-pipeline
drwxrwxr-x 2 ec2-user ec2-user  6 May 20 21:15 ccitjob-pipeline@tmp

Agent2 

[ec2-user@ip-10-0-1-207 workspace]$ ls -lrt
total 0
drwxrwxr-x 2 ec2-user ec2-user  6 May 20 20:15 ccitjob@tmp
drwxrwxr-x 5 ec2-user ec2-user 58 May 20 20:16 ccitjob
drwxrwxr-x 5 ec2-user ec2-user 58 May 20 21:15 ccitjob-pipeline
drwxrwxr-x 2 ec2-user ec2-user  6 May 20 21:15 ccitjob-pipeline@tmp


                                                            Stage 
Step1:
Using stage view we can get know job which stage failed see 
First check Tool install second check Clone Third check Build


Step2:
Creating One more job 

Create job >ccit-pipejob1 >Choose pipeline 
Groovy  script added below save and build  Build success 

pipeline {
    agent any

    stages {
        stage('Step1') {
            steps {
                echo 'This is Step1'
            }
        }
        stage('Step2') {
            steps {
                echo 'This is Step2'
            }
        }
        stage('Step3') {
            steps {
                echo 'This is Step3'
            }
        }
         stage('Step4') {
            steps {
                echo 'This is Step4'
            }
        }
    }
}
Step3:
See here Stages showing build Which stage failed, simple get know 
one more plugins we have using we have better view 


Step4:
Stage Better view add plugins 
Dashboard >Manage jenkins >plugins >available plugins  click install


Step5: Now you see the better view for immediate track or trace the issue for build issues, easy to understand which stage facing issue 


What are Artifacts ?
Artifacts are that output files generated during a jenkins build process.These can include compiled binaries,JAR files ,WAR files ,Docker images,or any other files needed for deployment 

.jar.war (called Artifacts) these artifact storage purpose we use some services s3,nexus,aws code artifcats 

main advantages version for files 


--Thanks 


Friday, May 16, 2025

Jenkins part5

 Jenkins part5

Class 25th Jenkins May 16th

Variable setup -pipeline

Build and deploy a simple java Project

                                                                  Practical

Prior you need install below softwares

[ec2-user@ip-10-0-1-158 ~]$ sudo -i

[root@ip-10-0-1-158 ~]# yum install -y java-17-amazon-corretto-devel git

[root@ip-10-0-1-158 ~]# sudo wget -O /etc/yum.repos.d/jenkins.repo \     https://pkg.jenkins.io/redhat-stable/jenkins.repo

[root@ip-10-0-1-158 ~]# sudo rpm --import https://pkg.jenkins.io/redhat-stable/jenkins.io-2023.key
[root@ip-10-0-1-158 ~]# sudo yum install jenkins
[root@ip-10-0-1-158 ~]# systemctl start jenkins


Step1: Create Pipeline job in Jenkins >ccitpipelinejob

for build the java project required maven tool,just add below save.

Step2: Pipeline script given and execute

pipeline {
    agent any
   tools
   {
       maven "ccit-mvn"
   }
    stages {
        stage('git') {
            steps {
                git branch: 'main', url: 'https://github.com/Vakatisubbu/ccit-javaapp.git'
            }
        }
           stage('build') {
            steps {
                sh "mvn clean package"
            }
        }
    }
}
Step3:After build .jar file created in the target server 
[root@ip-10-0-1-158 target]#  pwd
/var/lib/jenkins/workspace/ccitpipelinejob/target
[root@ip-10-0-1-158 target]# ls -lrt
drwxr-xr-x 3 jenkins jenkins       25 May 26 09:30 generated-sources
drwxr-xr-x 3 jenkins jenkins       35 May 26 09:30 maven-status
drwxr-xr-x 4 jenkins jenkins       34 May 26 09:30 classes
drwxr-xr-x 2 jenkins jenkins       28 May 26 09:30 maven-archiver
-rw-r--r-- 1 jenkins jenkins     3691 May 26 09:30 ccit-0.0.1.jar.original
-rw-r--r-- 1 jenkins jenkins 20125827 May 26 09:30 ccit-0.0.1.jar

Step4: Deploying same server launch website run the below command 

java -jar target/ccit-0.0.1.jar.jar --server.address=0.0.0.0 --server.port=8081

[root@ip-10-0-1-158 target]# java -jar ccit-0.0.1.jar --server.address=0.0.0.0 --server.port=8081

2025-05-26T09:43:52.178Z  INFO 23804 --- [           main] o.s.b.w.embedded.tomcat.TomcatWebServer  : Tomcat started on port(s): 8081 (http) with context path ''

2025-05-26T09:43:52.230Z  INFO 23804 --- [           main] com.example.App                          : Started App in 4.855 seconds (process running for 5.727)

Step5: See below index html page opened with ,which is you have given port 8081

Step6:here is the drawback the java run timer always need to execute ,if you cancel that the page will not open ,to over come the issue need create one service

[root@ip-10-0-1-158 target]# java -jar ccit-0.0.1.jar --server.address=0.0.0.0 --server.port=8081

Step7:Service creations ,what version you have mentioned in the pom.xml with same version will create .jar file, if version will change you can also do same changes on version
Created Service below way and start 
[root@ip-10-0-1-158 ~]# vi /etc/systemd/system/cciwebsite.service
[Unit]
Description=My Soring Boot Web Applicationaws
After=network.target
[Service]
User=ec2-user
workingDirectory=/var/lib/jenkins/workspace/ccitpipelinejob
ExecStart=/usr/bin/java -jar /var/lib/jenkins/workspace/ccitpipelinejob/target/ccit-0.0.1.jar --server.address=0.0.0.0 --server.port=8081
SuccessExitStatus=143
Restart=always
RestartSec=10
StandardOutput=journal
StandardError=journal
[Install]
WantedBy=multi-user.target
[root@ip-10-0-1-158 ~]# sudo systemctl start cciwebsite.service
[root@ip-10-0-1-158 target]# ps -ef|grep workspace
ec2-user 10023     1  4 13:00 ?        00:00:06 /usr/bin/java -jar /var/lib/jenkins/workspace/ccitpipelinejob/target/ccit-0.0.1.jar --server.address=0.0.0.0 --server.port=8081
root     11864  8149  0 13:02 pts/1    00:00:00 grep --color=auto workspace
Step8:With out running the command webpage open ,using service

Step9: we have problem , -if any have any changes on git script contact-123 added 


Step10
[root@ip-10-0-1-158 ~]# sudo systemctl daemon-reload
[root@ip-10-0-1-158 ~]# sudo systemctl enable cciwebsite.service
[root@ip-10-0-1-158 ~]# sudo systemctl restart cciwebsite.service
[root@ip-10-0-1-158 ~]# sudo systemctl start jenkins
Add Jenkins give permission to  sudo user
[root@ip-10-0-1-158 ~]# 
[root@ip-10-0-1-69 ~]#sudo -i
[root@ip-10-0-1-69 ~]# sudo visudo
jenkins ALL=(ALL) NOPASSWD: ALL

[root@ip-10-0-1-158 ~]# sudo systemctl daemon-reload
[root@ip-10-0-1-158 ~]# sudo systemctl restart cciwebsite.service

Step11:


Step12:
pipeline {
    agent any
   tools
   {
       maven "ccit-mvn"
   }
    stages {
        stage('git') {
            steps {
                git branch: 'main', url: 'https://github.com/Vakatisubbu/ccit-javaapp.git'
            }
        }
           stage('build') {
            steps {
                sh "mvn clean package"
                sh "sudo systemctl daemon-reload"
                sh "sudo systemctl restart cciwebsite.service"
                
            }
        }
    }
}
Step13: Git change  https://github.com/Vakatisubbu/ccit-javaapp.git,change contact-RAJA additional name for testing 
    <a class="nav-link" href="#">Contact-RAJA</a>

Step14:See after build automatically reflect the changes 


                                    How setup variables in Jenkins pipeline?
Variable in jenkins pipeline allow you to store and reuse values.You can define them at different levels.
->Environmet variables(Global & Custom)
->Pipeline parameters(User input)
->Local variables(inside pipeline)
 
Environment variable(Global & Custom)

Jenkins has built-in environment variables, but you can also define custom ones.
 Built-in Environment variables
Jenkins provides default environment variables like:
 $BULID_NUMBER -->Build number of the job.
$JOB_NAME-->Name of the current Jenkins job
$WORKSPACE-->Path of the workspace directory

Step1: Global Environment variable


 Step2: pipe line script
pipeline {
    agent any
    stages {
        stage('Hello') {
            steps {
                echo "Hello World: ${env.ccit}"
            }
        }
    }
}

After build environment value displayed

Started by user admin
[Pipeline] Start of Pipeline
[Pipeline] node
Running on Jenkins in /var/lib/jenkins/workspace/ccitpipeline
[Pipeline] {
[Pipeline] stage
[Pipeline] { (Hello)
[Pipeline] echo
Hello World: AWS
[Pipeline] }
[Pipeline] // stage
[Pipeline] }
[Pipeline] // node
[Pipeline] End of Pipeline
Finished: SUCCESS
Step3: environment Gobally define mean you can use all stages,below build 
pipeline {
    agent any
 environment {
            x='20'
        }
    stages {
       
        stage('First') {
            steps {
                echo "First: $x"
            }
        }
          stage('Second') {
            steps {
                echo "Second: $x"
            }
        }
    }
}

Step4:Build success 
First: 20
[Pipeline] }
[Pipeline] // stage
[Pipeline] stage
[Pipeline] { (Second)
[Pipeline] echo
Second: 20

Parameterized Block 

Step1:


Step2: pipeline script 

pipeline {
    agent any
 parameters {
            string(name:'ccit' ,defaultValue:'AWS', description: 'enter your course name')
        }
    stages {
       
        stage('First') {
            steps {
                echo "The course name is : ${params.ccit}"
            }
        }
             }
}


Started by user admin
[Pipeline] Start of Pipeline
[Pipeline] node
Running on Jenkins in /var/lib/jenkins/workspace/ccitpipeline
[Pipeline] {
[Pipeline] stage
[Pipeline] { (First)
[Pipeline] echo
The course name is : AWS
[Pipeline] }
[Pipeline] // stage
[Pipeline] }
[Pipeline] // node
[Pipeline] End of Pipeline
Finished: SUCCESS

Step3: Environment variables using we can get know build count ,build name ,total sofar 11 build 

pipeline {
    agent any
    stages {
       
        stage('First') {
            steps {
                echo "Build number is : ${env.BUILD_NUMBER}"
            }
        }
         
    }
}

Below is the console output

Running on Jenkins in /var/lib/jenkins/workspace/ccitpipeline
[Pipeline] {
[Pipeline] stage
[Pipeline] { (First)
[Pipeline] echo
Build number is : 11

--Thanks 


Thursday, May 15, 2025

Jenkins part4

 Jenkins part4

Class 24th Jenkins May 15th
  • Variables & Parameters in Jenkins project 
  • Pipeline structure & setup in Jenkins
(Some time we have to pass some inputs to jenkins job at runtime)
In Jenkins, parameters allow you to customize and control how a build run by  providing input values at runtime.There are several types of parameters you can use in a Jenkins project
Types of parameters in Jenkins
  • String parameter
  • Multi-line string parameter
  • Choice parameter
  • File parameter
  • Password parameter
  • Boolean parameter
Practical
Create one job Free style project 
Step1:  String parameter
Create Job >ccitvar >Freestyle project > Check This project is parameterized 


[root@ip-10-0-1-137 ccitvar]# pwd
/var/lib/jenkins/workspace/ccitvar
[root@ip-10-0-1-137 ccitvar]# ls -lrt
total 0
-rw-r--r-- 1 jenkins jenkins 0 May 24 12:49 ccit.txt
-rw-r--r-- 1 jenkins jenkins 0 May 24 12:54 aws.txt
-rw-r--r-- 1 jenkins jenkins 0 May 24 12:54 Devops.txt

Step2:  Multi-line string parameter
[root@ip-10-0-1-137 ccitvar]# ls -rlt
total 0
-rw-r--r-- 1 jenkins jenkins 0 May 24 13:10 GCP.txt
-rw-r--r-- 1 jenkins jenkins 0 May 24 13:10 Devops
-rw-r--r-- 1 jenkins jenkins 0 May 24 13:10 Azure
-rw-r--r-- 1 jenkins jenkins 0 May 24 13:10 AWS
Step3:Choice parameter
Build parameter list 
[root@ip-10-0-1-137 ccitvar]# ls -lrt
total 0
-rw-r--r-- 1 jenkins jenkins 0 May 24 13:17 Azure.txt

Step4: File parameter This Upload your files
Choose you file in you laptop and build upload some text file ,it will created with given file name
Placed 
[root@ip-10-0-1-137 ccitvar]# ls -rlt
total 0
-rw-r--r-- 1 jenkins jenkins 0 May 24 13:21 script.sh

Pipeline setup in Jenkins 
Jenkins pipeline is a combination of plugins that Support integration and implementation of continuous delivery pipelines
A pipeline is a group of events interlinked with each other in sequence 
There are two types of Jenkins pipeline syntax used for defining you Jenkins file:
  •  Declarative pipe line (Recommeded)
Easier to read and maintained 
Uses as structure pipe line {} block
Best for simple CI/CD pipline 
Why we use declaration (Simple and structured,built-in error handling, Best for CI/CD use cases)
  •  Scripted (Most Felxible)
Uses node {} instead of pipeline{}
Provide more control (eg. loops,Conditionals)
suitable for complex automation workflows
why user scripted(more control with loops & conditionals,Supports custom logic (id-else,try-catch)
,Best for advanced users & dynamic workflows)

Free style Project : only select save Command and build
Pipeline  : Here we write scripts 
Code->Build->Test->Deploy
Declarative (PASSS)
  Newitem ->Name ->Pipeline ->Save
 pipeline {
  agent any (Where you build need perform,your server or any other server Slave concept)
     stages {
               stage ("code"){
                            steps {
                                           Action (Git)
                          
                                      }
                           
                          }
                    }
            }
P-Pipeline A- Agent S -Stages -Stage -Steps

Step5: create job in  ccitpipelinejob

pipeline {
    agent any

    stages {
        stage('dev') {
            steps {
               sh "sudo yum install -y httpd"
               sh "sudo systemctl start httpd"
               sh "sudo git clone https://github.com/cloudcomputingintelugu/ccitwebsite.git"
               sh "sudo cp -r ccitwebsite/* /var/www/html"
            }
        }
    }
}

Build will failed ,Due to Jenkins don't have direct root user permissions install the softwares

Started by user admin [Pipeline] Start of Pipeline [Pipeline] node Running on Jenkins in /var/lib/jenkins/workspace/ccitpipelinejob [Pipeline] { [Pipeline] stage [Pipeline] { (dev) [Pipeline] sh + sudo yum install -y httpd We trust you have received the usual lecture from the local System Administrator. It usually boils down to these three things:ERROR: script returned exit code 1 Finished: FAILURE
Step6: Add Jenkins give permission to 
[root@ip-10-0-1-69 ~]#sudo -i
[root@ip-10-0-1-69 ~]# sudo visudo
## Read drop-in files from /etc/sudoers.d (the # here does not mean a comment)
jenkins ALL=(ALL) NOPASSWD: ALL
#includedir /etc/sudoers.d
Step7:Build Success

Step8: Git simple web page file hosted successfully to the server 
[root@ip-10-0-1-69 ccitwebsite]# ls -lrt
total 44
-rw-r--r-- 1 root root   789 May 25 07:21 readme.txt
-rw-r--r-- 1 root root 40878 May 25 07:21 index.html
drwxr-xr-x 8 root root    77 May 25 07:21 assets

Step9:Web page open successfully hosted 


--Thanks


Wednesday, May 14, 2025

Jenkins part3

 Jenkins part3

Class 23rd Jenkins May 14th

  • User Creation and management in Jenkins
  • Variables & parameters in Jenkis Project
  • Pipeline structure & setup in Jenkins
  • Freestyle vs Pipleline in Jenkins
  • Declarative vs Scripted pipelines
  • Jenkins Master-slave (controller-Agent) Setup
  
                                        User Creation and management in Jenkins

Root user (admin user) has below permission

  Create jobs, run jobs, pipelines, credentials , plugins, user & permissions

  Rootuser -->admin user --Dev users (Build view)

                                         --Test users  (view create)

                                         --Devops users (create build view)


Step1:Create job >Select Freestyle project


Step2:

Dashboard >Manage Jenkins >Click Users


Create three like this dev,test,prod


Step3: Create three jobs Dev jobs/Test jobs/Prod Jobs 

One Job Permission (Status,changes,workspace,Build now,Configure,Delete project,Rename)

See below dev user login ,as of now , permission not defined , so showing all 


Before going to give permission need to install pugins Rolebased  authenications >install

Manage Jenkins >Available Plug's  Rolebased  Authenications >install

Step4: Select Rolebased -strategy and save 


Step5:You see Manage and Assign Roles new role came to in security session Click Mange and roles

Step6: Add new roles devrole/testrole/prodrole and click save 


Step7: Add users de/test/prod and assign appropriate rule to the users Role 


Step8: Login dev user ,you see below Access denied ,due to we did not assigned any roles to users
 Check above screen shot step6
Step9: ManageRoles >give read permission to check 


Step10:See below now all user able view ,left side new build option to exeute because only read option


Step11: You can choose appropriate role and give to the users ,for test we give Build Permission to dev role user


Step12: After Login  dev user ,you see below able build the job 

Step13:If you want give name particular build  ,we can give like below

Step14:
Reference :Manage role Agent user ,Node it use for build will be in different instance master and Slave.
Credentials service used for s3 bucket move the files get files

User Creation and Management in Jenkins (For Dev team ,members user creation and permission)

Users in Jenkins represent individual team members who need access to the system. Each user can have different levels of access based on their role

Jenkins is a CI/CD automation tool that allows multiple users to build,test and deploy software.
Managin users and role is essential to ensure security,control, and efficiency in a multi-user environment

Benefits of user management 
  Accountability :Track who triggered builds and made changes 
  Security: Restricts access to prevent unauthorized changes 
  Customization: Users can have personalized dashboard and preferences
  Audit & Logging:Prvides logs of users actions for troubleshooting 

User Authentication Options 
 Jenkins internal Database(default)
  LDAP/Active directory 

                                                   Matrix Based  Role
it is for Project based not for the Job base 

Step1: Dashboard >Manage Jenkins >Security 
Authorization > Select Project-based Matrix Authorization strategy 
Add users which is you have dev/test/prod users  give read permission


Step2:

 Go to particular job for dev job select Enabled project-based security, and add user which going give permission to the user ,see here i have added dev user give all permissons

See here one only showing particular job devjob not all jobs, those which we give access ,Build also success status
These are all job list in admin user 

 Dev user as given permission show only Project based 


 For Test user 

For prod 


 That is differece Rolebase and Project Matrix based For Rolebased need to install plugins 
for manage and role permision.


 --Thanks