Monolithic web project AWS
Class 11th Worked on Monolithic Web-application
Requirement: Create a simple monolithic web application using python further i will converted it into 3 tier architecture
Require Sign-up and Sign-in pages and signup page (Name,Mobilenumber,password and user image should be taken,data will be stored in my sql database image should be stored in the same root folder.
Tech stack:
Backend: Python(Flask for simplicity)
Frontend: HTML/CSS(basic forms)
Database: Mysql
Image storage: Stored in the root static/images/ folder of the project
Step1:Create one Windows VM

Step2:After Launch completed ,need attached security key using below navigation


Step4:Below password generated ,this auto generated Privatekey and public key combination generate password
Step5:Follow below chatgpt 
https://chatgpt.com/share/680a6197-31c0-8008-bd19-b051a105a25b
Step6: Search Google test Python install window click below url while download No thank just download
Installation steps:
While installation choose Full (Workbench is required that is database editor)
While installation choose Full (Workbench is required that is database editor)
After Click Next, Next
Given Password Root password
Click Next, Next
Click Execute
Click Finish and Cancelled
Step7:Go window enter Mysql work beach ,it uses for query sql editor table access
After installation remove default instance connection which there
select and Delete existing root connection select delete connection, Need to give connection manually
Given your root/password connection test connection and then click ok

Step8:Above icon Create schema click apply, apply Finish

Step9: Select schema tab below ,create tables

Step10: Need to create below Folders in VM C:\
OnlineLibrary/
│
├── app.py # Main Flask application
├── config.py # DB config and connection settings
├── requirements.txt # Python dependencies
│
├── templates/ # HTML templates
│ ├── signup.html
│ ├── signin.html
│ └── welcome.html
│
├── static/ # Static files (CSS, images, JS)
│ ├── css/
│ │ └── style.css # Your custom styling
│ └── images/ # Uploaded user images
Change below Config file

Step11:Python need to install ,Google text search Python install window 11

requirements.txt
Flask
Flask-MySQLdb
Werkzeug

Step13:After completion required flash installation, need execute final step phyton script run
We can copy the files or file text to your files using below url
https://drive.google.com/drive/folders/1UU3FBE2QjRdsb9KuvNfigkm6JAVKSzBa?usp=drive_link

Step14:After execute below, click url ctl or else copy the url past to the browser

Step15:Login page came successfully

Step16:Click signup Give your details and click signup,

Step17:Afer you signup, get message Registration successful please login and check once
you need check in database data inserted or not ,you see below records inserted

Step18: Login once with your credentials 


Step3: After port added in the firewall ,execute the python app.py command again ,now it is start started

Our Project Gobal accessing
Step1: Need to execute some commands in the project folder
python -m venv venv
venv\Scripts\activate
pip install waitress

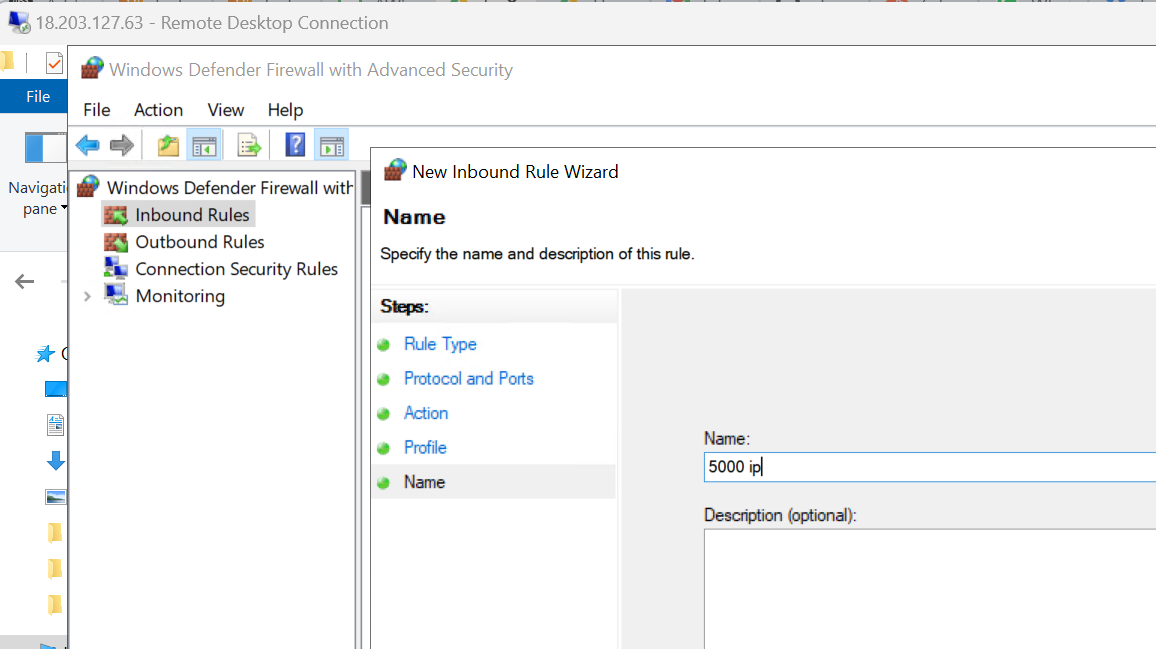
Step2:Allow Access in Firewall Open Windows Defender Firewall ➜ Inbound Rules ➜ Add a New Rule :Type: Port,Port: 5000,Allow connection,Apply to Domain, Private, Public
Name: Flask Web App (Name as you wish) , I have given 5000 ip

Step4:Now Access your application Globally with our public ip and port number ,while you create VM Public IP accessed for that ,take that ip entension with port number
You see below sign in page successfully

Step5:After login with old user ,login successfully

Step6:Now you signup new user ,with details click signup


 You see above new regarding inserted successfully, this is the way Monolithic Simple project build
Monolithic Architecture: Everything Frontend (UI) ,Back-end(logic),Database Access is combined into one big application called monolithic.
We have Three Layer of approach
1.Presentation Layer ->Frontend(HTML/CSS/Javascript)
2.Application Layer ->Backend (Python Flask APIs)
3.Data Layer ->Database (Mysql)
No comments:
Post a Comment