Friday, May 9, 2025

Terraform Provisioners

Terraform block
Class 19th Terraform block and provide version constraints May 9th(Devops)
Providers block
Local Version changing
Terraform block and provider version constraints 
Hcp Cloud

Provider Block 
 By default, provider plugins in terraform change every few weeks 
 When we run the init command , it download the latest plugins always.
 Some code will not work with old plugins, so we need to update them
 To get the latest provider plugins: https://registry.terraform.io/browse/providers.
 When you add a new provider,"terraform init" is a must.
 terraform providers:Lists the providers required to run the code.
 To create infrastricture on any cloud,all we need to have is a provider

Types: Official: Manager by terraform
            Partner:Managed by a third-party company
            Community:Managed by individuals

For The Terraform Block provider block ,here we need mentioned our provide, forex aws,azure,GCP..etc when you do terraform init ,automatically terraform get the latest plugin's from
the provider, Some time we need mention specific version also, instead of latest version 
Ex:-Provider "aws"{
}
Below is the Script for Terrafrom installation on Amazon Linux
sudo yum install -y yum-utils shadow-utils
sudo yum-config-manager --add-repo https://rpm.releases.hashicorp.com/AmazonLinux/hashicorp.repo
sudo yum -y install terraform
Step1: After terraform installation ,we can able give command check version of terraform 
[ec2-user@ip-10-0-0-213 ~]$ terraform --version
Terraform v1.11.4
[ec2-user@ip-10-0-0-213 ~]$ cat cloudinfra.tf
provider "aws"{
region ="eu-west-1"
}
Step2:While enter the command terrafrom provider plugin's installing 
[ec2-user@ip-10-0-0-213 ~]$ terraform init
Initializing the backend...
Initializing provider plugins...
- Finding latest version of hashicorp/aws...
- Installing hashicorp/aws v5.97.0...

Step3: As see now terraform version coming with provide version also, the version will be change frequently, we have feasibility to change version whatever your required for you code,

As see below provide screen shot Version 6.0.0-beta version exist but for later terrafrom take 5.97.0 version ,Due to beta mean it is not full-fledged release to market still testing phase, so latest installed 5.97.0 only, if you want give specific version to install your instance ,right of the screen shot,take code and copy, enter terrform init for desired version

[ec2-user@ip-10-0-0-213 ~]$ terraform --version
Terraform v1.11.4
on linux_amd64
+ provider registry.terraform.io/hashicorp/aws v5.97.0
Step4:Give the code and save run the command terraform init -upgrade
[ec2-user@ip-10-0-0-213 ccit]$ cat cloudinfra.tf
provider "aws"{
region ="eu-west-1"
}
terraform {
  required_providers {
    aws = {
      source = "hashicorp/aws"
      version = "6.0.0-beta1"
    }
  }
}

Step5: As see below terraform upgraded beta version ,we have specifically mentioned the version so that , it was installed you can downgrade also using same command 

[ec2-user@ip-10-0-0-213 ccit]$ terraform init -upgrade
Initializing the backend...
Initializing provider plugins...
- Finding hashicorp/aws versions matching "6.0.0-beta1"...
- Installing hashicorp/aws v6.0.0-beta1...
- Installed hashicorp/aws v6.0.0-beta1 (signed by HashiCorp)

[ec2-user@ip-10-0-0-213 ccit]$ terraform -version
Terraform v1.11.4
on linux_amd64
+ provider registry.terraform.io/hashicorp/aws v6.0.0-beta1
Step6:Downgrade V6.0.0 same command , we can use > lessthan < greater than also  using version >="5.96.0"
[ec2-user@ip-10-0-0-213 ccit]$ terraform init -upgrade
Initializing the backend...
Initializing provider plugins...
- Finding hashicorp/aws versions matching "5.96.0"
[ec2-user@ip-10-0-0-213 ccit]$ terraform -version
Terraform v1.11.4
on linux_amd64
+ provider registry.terraform.io/hashicorp/aws v5.96.0

                               Provisioners(File, Local-exec, Remote exec)
If you are working with multiple instances file transfer from server provisioner will help 
Local-Exec Provisioner ,Remote-Exec Provisioner ,File Provisioner
Local-Exec Provisioner:  (Using for logs storage for particular instance)
Runs a command on your local machine (Where terraform is executed)
Useful for tasks like sending notifications or running local scripts
Remote-Exec Provisioner:(if you want execute any commands )
Runs commands on the remote machine after SSH access.
Used for configuration tasks like installing packages
File Provisioner:(if any file created local move remotely for that file using this, it will work ssh protocol)
Transfer files from your local machine to the remote instance 
Works only for resources with SSH access (like EC2)

Metadata information about for ex:-s3 create for bucket information ,if want store use local executor 
which local executor created the file ,the file if you want to copy any other instance using file executor .
Remote executor terraform code while you creating instance  if want run  command or installed any package use remote executor 

 Practical  Local executor 
 Step1: The depends_on argument in Terraform is used to explicitly declare resource dependencies.
[ec2-user@ip-10-0-0-213 ccit]$ cat cloudinfra.tf
provider "aws" {
region = "eu-west-1"
}
resource "aws_s3_bucket" "bucketlocal"{
 bucket ="ccitmay92025"
  tags = {
        Name ="Dev Bucket"
        Environment ="Development"
          }
}
resource "null_resource" "save_bucket_details" {
  depends_on = [aws_s3_bucket.bucketlocal]

  provisioner "local-exec" {
   command = <<EOT
     echo "Bucket Name: ${aws_s3_bucket.bucketlocal.id}" > bucket_detail.txt
     echo "Region: eu-west-1" >> bucket_detail.txt
     echo "Tags: Name=${aws_s3_bucket.bucketlocal.tags.Name},Environment=${aws_s3_bucket.bucketlocal.tags.Environment}" >> bucket_detail.txt
     EOT
}
}
[ec2-user@ip-10-0-0-213 ccit]$ terraform apply -auto-approve
Apply complete! Resources: 2 added, 0 changed, 0 destroyed.
Step2: as you see below bucket details capture as ouput 
[ec2-user@ip-10-0-0-213 ccit]$ ls -lrt
total 12
-rw-r--r--. 1 ec2-user ec2-user  617 May 10 13:41 cloudinfra.tf
-rw-r--r--. 1 ec2-user ec2-user   90 May 10 13:43 bucket_detail.txt
-rw-r--r--. 1 ec2-user ec2-user 3266 May 10 13:43 terraform.tfstate
[ec2-user@ip-10-0-0-213 ccit]$ cat bucket_detail.txt
Bucket Name: ccitmay92025
Region: eu-west-1
Tags: Name=Dev Bucket,Environment=Development
Bucket created successfully


                                                      Practical  File executor  
Transfer the file from one instance to other instance you need sshkey .pem file for the source instance to  destination instance sshkey copy this server to connect target server 

Step1:Actually we are using same pem file to connect any other linux server ,similay way you can  
give same .pem fie key to which you going create the target server key also

Step2: Source instance ~/.ssh/  this path create file copy above key and save 
[ec2-user@ip-10-0-0-213 .ssh]$ pwd
/home/ec2-user/.ssh
[ec2-user@ip-10-0-0-213 .ssh]$ vi my-key.pem
[ec2-user@ip-10-0-0-213 .ssh]$ ls -lrt
total 8
-rw-------. 1 ec2-user ec2-user  391 May 10 11:56 authorized_keys
-rw-r--r--. 1 ec2-user ec2-user 1679 May 10 14:23 my-key.pem
Step3:
[ec2-user@ip-10-0-3-137 ccit]$ cat cloudinfra.tf
provider "aws" {
  region = "eu-west-1"
}

# Create an EC2 Instance (Amazon Linux 2)
resource "aws_instance" "example" {
  ami           = "ami-04e7764922e1e3a57"  # Amazon Linux 2 AMI
  instance_type = "t2.micro"
  key_name      = "Terraform"  # Replace with your SSH key
  subnet_id     = "subnet-0477e85088645156b"
  # Step 1: Create a local file with instance details
  provisioner "local-exec" {
    command = <<EOT
      echo "Instance ID: ${self.id}" > instance_details.txt
      echo "Public IP: ${self.public_ip}" >> instance_details.txt
      echo "Region: ap-south-2" >> instance_details.txt
    EOT
  }

  # Step 2: Copy the file to the EC2 instance
  provisioner "file" {
    source      = "instance_details.txt"
    destination = "/home/ec2-user/instance_details.txt"
  }

  connection {
    type        = "ssh"
    user        = "ec2-user"
    private_key = file("~/.ssh/my-key.pem")  # Path to your private key
    host        = self.public_ip
  }
}
[ec2-user@ip-10-0-0-213 ccit]$ terraform apply -auto-approve

Apply complete! Resources: 1 added, 0 changed, 0 destroyed.

[ec2-user@ip-10-0-3-137 ccit]$ ls -lrt
total 20
-rw-r--r--. 1 ec2-user ec2-user  970 May 10 19:35 cloudinfra.tf
-rw-r--r--. 1 ec2-user ec2-user   76 May 10 19:36 instance_details.txt
-rw-r--r--. 1 ec2-user ec2-user  181 May 10 19:36 terraform.tfstate.backup
-rw-r--r--. 1 ec2-user ec2-user 4723 May 10 19:36 terraform.tfstate

Step3: New instance created successfully.

Step4: Need to check file transferred or not you see target side file transferred successfully

Source:
[ec2-user@ip-10-0-3-137 ccit]$ cat instance_details.txt
Instance ID: i-02cd51ac159fe6169
Public IP: 54.73.41.102
Region: ap-south-2

Target file transferred successfully

[ec2-user@ip-10-0-3-171 ~]$ ls -lrt
total 4
-rw-r--r--. 1 ec2-user ec2-user 76 May 10 19:36 instance_details.txt
[ec2-user@ip-10-0-3-171 ~]$ cat instance_details.txt
Instance ID: i-02cd51ac159fe6169
Public IP: 54.73.41.102
Region: ap-south-2
[ec2-user@ip-10-0-3-137 ccit]$ terraform destroy -auto-approve
Destroy complete! Resources: 1 destroyed.

                                                    Remote executor 
Packages and  User command  installed while launching the instance inline query we have mentioned the query ,all command installed remotely

Step1
[ec2-user@ip-10-0-3-137 ccit]$ cat cloudinfra.tf
provider "aws" {
  region = "eu-west-1"
}

# Create an EC2 Instance (Amazon Linux 2)
resource "aws_instance" "example" {
  ami           = "ami-04e7764922e1e3a57"  # Amazon Linux 2 AMI
  instance_type = "t2.micro"
  key_name      = "Terraform"  # Replace with your SSH key
  subnet_id     = "subnet-0477e85088645156b"
  # Step 1: Create a local file with instance details
tags = {
    Name        = "CCIT-Website"
    Environment = "Production"
  }

  # Execute commands inside EC2
  provisioner "remote-exec" {
    inline = [
      "#!/bin/bash",
      "sudo yum update -y",
      "sudo yum install -y httpd git",
      "sudo systemctl start httpd",
      "sudo systemctl enable httpd",
      "git clone https://github.com/cloudcomputingintelugu/ccitwebsite.git",
      "sudo cp -r ccitwebsite/* /var/www/html/",
      "sudo chown -R apache:apache /var/www/html",
      "sudo systemctl restart httpd"
    ]
  }

  connection {
    type        = "ssh"
    user        = "ec2-user"
    private_key = file("~/.ssh/my-key.pem")  # Path to your private key
    host        = self.public_ip
  }
}

output "website_url" {
  value = "http://${aws_instance.example.public_ip}"
}
[ec2-user@ip-10-0-3-137 ccit]$ terraform apply -auto-approve

Apply complete! Resources: 1 added, 0 changed, 0 destroyed.

Outputs:

website_url = "http://3.250.69.211"

 Instance created successfully and installed Apache and also host the website 

As you see new instance wesite file stored run time
[ec2-user@ip-10-0-3-182 ccitwebsite]$ pwd
/home/ec2-user/ccitwebsite
[ec2-user@ip-10-0-3-182 ccitwebsite]$ ls -lrt
total 44
-rw-rw-r--. 1 ec2-user ec2-user   789 May 10 21:15 readme.txt
-rw-rw-r--. 1 ec2-user ec2-user 40878 May 10 21:15 index.html
drwxrwxr-x. 8 ec2-user ec2-user    77 May 10 21:15 assets
[ec2-user@ip-10-0-3-182 ccitwebsite]$

[ec2-user@ip-10-0-3-137 ccit]$ terraform destroy -auto-approve

Destroy complete! Resources: 1 destroyed.

                                                               Terraform 
  • HCP Cloud introduction and features 
  • Github communication 
  • Build Infra with HCP
Hashicorp Cloud , We need signup the account  in HCP cloud and link to Git hub files 
and build the infrastructure  

HCP Cloud Introduction and features
Hcp means HashiCorp cloud platform 
it is a managed plant form to automate cloud infrastructure
it provides privacy,security and isolation
it supports multiple providers like AWS,Azure and Google cloud
It offers a suite of open-source tool for managing infrastructure,including terraform,vault,consul, and Nomad.
we can use different code repositories for a project 
we can use variable sets to apply the same variables to all the workspaces.


Step1: 
  • Go to Google & type: Hcp cloud account sing-in/Signup
  • Email & password
  • Continue with HCP account
  • Create A Git hug account 
  • Create repo-->name -->add new file -->write terraform code -->commit
https://www.hashicorp.com/en/cloud

here is benefits of HCP cloud terraform state file automatically handled by HCP cloud , if any one multiple people  working  same repository it is locked automatically we need unlock manually,
if any done in git commit automatically terraform plan applied to HCP infra side , need apply manually

HCP Service: Vault,consul,Boundary,waypoint,terraform ..etc
While login automatically Created project vakati-subbu-org


 Main products 
  • Terraform: to create infrastructure
  • Vault to manage the secrets and protecting sensitive data 
  • Normad: to schedule,deploy and manage applications
  • Consul: to secure serive-to-service communication and networking
  • Packer:to create images for launching servers

Step2:Select Terraform click -> continue to HCP Terraform -->Click Continue with Hcp account

Create a new HCP-linked account ->Click continue
Create organization name click create organization

Step3: Now need linkup and git hub repository ,as you see below version controls in HCP, aws has earlier version control code commit now not supported 

Click GitHub >Github.com >Signin git >approved authorized terraform cloud click continue  

See below all your repositories are showing in HCP cloud 


Git Create new repository 


Refresh the HCP Cloud select the repository >it will create the new Workspace 

$ git clone  https://github.com/Vakatisubbu/ccitterrfrom.git
$git add .
$git commit -m "First commit"
$git remote add origin https://github.com/Vakatisubbu/ccitterrfrom.git
$ git push -u origin main
Enumerating objects: 5, done.
Counting objects: 100% (5/5), done.
Delta compression using up to 4 threads
Compressing objects: 100% (2/2), done.
Writing objects: 100% (3/3), 336 bytes | 336.00 KiB/s, done.
Total 3 (delta 0), reused 0 (delta 0), pack-reused 0 (from 0)
To github.com:Vakatisubbu/ccitterrfrom.git
   6e92495..79ce011  main -> main
branch 'main' set up to track 'origin/main'.

Signin Git with token instead of username and password 
Git >setting >Developer Settings >personal access tokens >fine-grained tokens >click Geneate new token     >give tokenname  "ccitgittoken" >select all repositories >click generate token 

it temporary only 7 days like that 
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

sign in with next time with token


This Our new workspace ,here configure variables


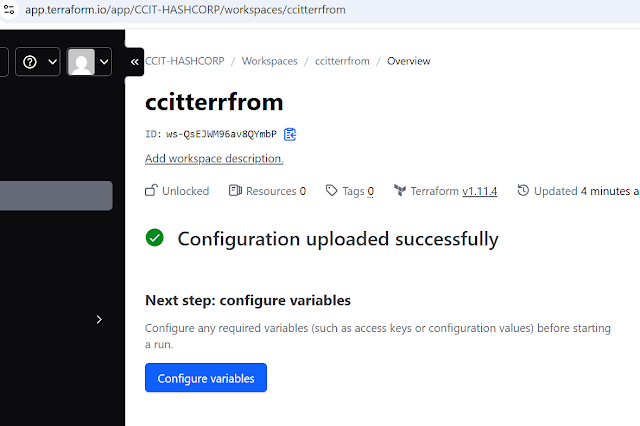
Click configure variables, for setup the environmental variables HSCP to communicate AWS 
need to provide secrete key and authentication ,take any user Authentication detail in AWS side
 
AWS >IAM USER >  admin user it has already administrator access, select Security credentials
>Accesskey >Click Create access key

click next ,click Create access key, download file  click done 
Access like below ,We need follow some structure environment key set should follow the same 
Access key ID                                  Secret access key
AKIATFBMO7H4GQ5PHUZS p0XMp+d7h2xPrPm3UsIB6BO/2clP7S+7I40LvSV3
Should follow same text ,take the variables add to you HSCP  >workspace variable
AWS_ACCESS_KEY_ID =
AWS_SECRET_ACCESS_KEY =
check box check sensitive for security ,add another variable same , next click new run 
Click New run and then click start


Step 4: I have done small change on the git  and commit , HCP planning is running automatically
Administrator@DESKTOP-AV2PARO MINGW64 /c/git_repos/ccitterrfrom (main)
$ vi Cloudinfra.tf

Administrator@DESKTOP-AV2PARO MINGW64 /c/git_repos/ccitterrfrom (main)
$ git add .

Administrator@DESKTOP-AV2PARO MINGW64 /c/git_repos/ccitterrfrom (main)
$ git commit -m "third commit"
[main 0432933] third commit
 1 file changed, 4 insertions(+), 3 deletions(-)

Administrator@DESKTOP-AV2PARO MINGW64 /c/git_repos/ccitterrfrom (main)
$ git push -u origin main
Enumerating objects: 5, done.
Counting objects: 100% (5/5), done.
Delta compression using up to 4 threads
Compressing objects: 100% (2/2), done.
Writing objects: 100% (3/3), 333 bytes | 166.00 KiB/s, done.
Total 3 (delta 0), reused 0 (delta 0), pack-reused 0 (from 0)
To github.com:Vakatisubbu/ccitterrfrom.git
   ead2ea9..0432933  main -> main
branch 'main' set up to track 'origin/main'.
HCP planning is running automatically


 As see below plan finished successfully 
 You need to Apply manualy,click  give comments "First bucket creation HCP" and then confirm apply

$ cat Cloudinfra.tf
provider "aws" {
  region = "eu-west-1"
}

resource "aws_s3_bucket" "ccitbucket" {
  bucket = "ccitapril"

}

AWS console bucket created 

Added second Bucket HCP colud automatically planned, you need apply manually
Administrator@DESKTOP-AV2PARO MINGW64 /c/git_repos/ccitterrfrom (main)
$ cat Cloudinfra.tf
provider "aws" {
  region = "eu-west-1"
}
resource "aws_s3_bucket" "ccitbucket" {
  bucket = "ccitapril"
}
resource "aws_s3_bucket" "ccitbucket1" {
  bucket = "ccitaprilmay"
}
Administrator@DESKTOP-AV2PARO MINGW64 /c/git_repos/ccitterrfrom (main)
$ git add .
Administrator@DESKTOP-AV2PARO MINGW64 /c/git_repos/ccitterrfrom (main)
$ git commit -m "Second Bucket creation"
[main b109ec8] Second Bucket creation
 1 file changed, 1 insertion(+), 1 deletion(-)

Administrator@DESKTOP-AV2PARO MINGW64 /c/git_repos/ccitterrfrom (main)
$ git push -u origin main
Enumerating objects: 5, done.
Counting objects: 100% (5/5), done.
Delta compression using up to 4 threads
Compressing objects: 100% (2/2), done.
Writing objects: 100% (3/3), 284 bytes | 284.00 KiB/s, done.
Total 3 (delta 1), reused 0 (delta 0), pack-reused 0 (from 0)
remote: Resolving deltas: 100% (1/1), completed with 1 local object.
To github.com:Vakatisubbu/ccitterrfrom.git
   8c49066..b109ec8  main -> main
branch 'main' set up to track 'origin/main'.


Aws console Second bucket created.


 Destroy plan 
HCP  Setting >Destruction and deletion >click button Queue destroy plan ,give name Queuedestroyplan

Three bucket Destroyed  plan ready and confirm through HCP


in aws console also S3 bucket removed successfully.

--Thanks 


Saturday, May 3, 2025

Terraform locals

Terraform locals

Class 18th Terraform Locals May3rd(Devops)

In Terraform ,locals are used to define local values within module. These values help simplify configurations by assigning names to expressions, making them easier to reference throughout the configuration 

Why Use locals?

Improve readability :Instead of repeating complex expressions, you can define them once and use muliple.

Avoid repetition :Helps in maintaining the DRY(Don't repeat yours self) priciple

Enhance Maintainability :If a value need to updated, you only change it in once a place .

Step1:

[ec2-user@ip-172-31-17-136 ccit]$ cat cloudinfra.tf
provider "aws" {
region = "eu-west-1"
}
locals{
bucketname="ccitbucket242"
env="dev"
}
resource "aws_s3_bucket" "ccitbucket" {
bucket=local.bucketname
 tags = {
   Name = local.env
  }
}
resource "aws_vpc" "ccitvpc"{
 cidr_block ="10.0.0.0/16"
 tags = {
   Name = "${local.env}-VPC" # concate
   }
}

[ec2-user@ip-172-31-17-136 ccit]$ terraform apply -auto-approve

Apply complete! Resources: 2 added, 0 changed, 0 destroyed.

Step2:You see VPC dev created, this way we can use locals

                                                             Variable Precedence

  • Define the level priority for variables in terraform
  • Terraform will pick the variables in the following order:
  1. CLI (command prompt)
  2. dev.tfvars
  3. Environment variables
  4. variable.tf

Step1: Just simple script bucket creation
[ec2-user@ip-172-31-17-136 ccit]$ cat cloudinfra.tf
provider "aws" {
region = "eu-west-1"
}
resource "aws_s3_bucket" "ccitbucket" {
bucket=var.bucketname
}
variable "bucketname" {
 default ="ccitbucket3may-var"
}

Step2:We plan the variable through cli using command the script already had bucketname default name, if you pass value specifically though cli 

[ec2-user@ip-172-31-17-136 ccit]$ terraform apply -auto-approve -var="bucketname=ccitbucket3may-cli"

Plan: 1 to add, 0 to change, 1 to destroy.
aws_s3_bucket.ccitbucket: Destroying... [id=ccitbucket3may-var]
aws_s3_bucket.ccitbucket: Destruction complete after 1s
aws_s3_bucket.ccitbucket: Creating...
aws_s3_bucket.ccitbucket: Creation complete after 0s [id=ccitbucket3may-cli]
Apply complete! Resources: 1 added, 0 changed, 1 destroyed.

Step3: As you observe ,it was not take default value as per variable precedence it takes cli name 

Step2: dev.tfvars which you pass value to cli command explicitly, it will take that one only
Step3:Environment variables,as see even you have set environment value also it took cli name only
[ec2-user@ip-172-31-17-136 ccit]$ export TF_VAR_bucketname=ccitbucket3may-envar
[ec2-user@ip-172-31-17-136 ccit]$ terraform apply -auto-approve -var="bucketname=ccitbucket3may-cli1"
Apply complete! Resources: 1 added, 0 changed, 1 destroyed.

Step4: with out pass any value it will take environment variable value,use use globally for the variable
[ec2-user@ip-172-31-17-136 ccit]$ terraform apply -auto-approve
Apply complete! Resources: 1 added, 0 changed, 1 destroyed.


unset TF_VAR_bucketname

                                                      Terraform Collections
Collections are just array concept key value pair ,for this have elements (for loops,set,list,map)
for_each: is used to loop over a map or  a set to create multiple resources dynamically ,se the the string

List in terraform 
A list in terraform is an ordered collection of elements where each item has a specific position(index).Duplicate are allowed 

Set in terraform
Set in terraform in an unordered collection of unique elements .Duplicates are not allowed 

List example foreach not support for_each, it will support for set or map

Step1: List using create buckets 
[ec2-user@ip-172-31-17-136 ccit]$ cat cloudinfra.tf
provider "aws" {
region = "eu-west-1"
}
resource "aws_s3_bucket" "ccitbucket" {
  count =length(var.my_list)
  bucket="ccit-${var.my_list[count.index]}"
}
variable "my_list" {
  type=list(string)
  default =["bucket3may-1","bucket3may-2","bucket3may-3"]
}
[ec2-user@ip-172-31-17-136 ccit]$ terraform apply -auto-approve
Plan: 3 to add, 0 to change, 0 to destroy.
aws_s3_bucket.ccitbucket[2]: Creating...
aws_s3_bucket.ccitbucket[0]: Creating...
aws_s3_bucket.ccitbucket[1]: Creating...
aws_s3_bucket.ccitbucket[0]: Creation complete after 1s [id=ccit-bucket3may-1]
aws_s3_bucket.ccitbucket[2]: Creation complete after 1s [id=ccit-bucket3may-3]
aws_s3_bucket.ccitbucket[1]: Creation complete after 1s [id=ccit-bucket3may-2]

Apply complete! Resources: 3 added, 0 changed, 0 destroyed.
using list successfully create three buckets

Step2:if you give list duplicate value ,it will try create error out remain will created, if you over come this problem use set
[ec2-user@ip-172-31-17-136 ccit]$ terraform apply -auto-approve
  default =["bucket3may-1","bucket3may-2","bucket3may-3","bucket3may-3"]
 Error: creating S3 Bucket (ccit-bucket3may-3): operation error S3: CreateBucket, https response error StatusCode: 409, RequestID: BucketAlreadyOwnedByYou:
│   with aws_s3_bucket.ccitbucket[2],
│   on cloudinfra.tf line 5, in resource "aws_s3_bucket" "ccitbucket":
│    5: resource "aws_s3_bucket" "ccitbucket" {

SET

Step1: set need to use for_each

[ec2-user@ip-172-31-17-136 ccit]$ cat cloudinfra.tf
provider "aws" {
region = "eu-west-1"
}
resource "aws_s3_bucket" "ccitbucket" {
  for_each =var.my_list
  bucket= "ccit-${each.value}"
}
variable "my_list" {
  type=set(string)
  default =["bucket3may-1","bucket3may-2","bucket3may-3","bucket3may-3" ]
}
[ec2-user@ip-172-31-17-136 ccit]$ terraform apply -auto-approve
Plan: 3 to add, 0 to change, 0 to destroy.
aws_s3_bucket.ccitbucket["bucket3may-2"]: Creating...
aws_s3_bucket.ccitbucket["bucket3may-3"]: Creating...
aws_s3_bucket.ccitbucket["bucket3may-1"]: Creating...
aws_s3_bucket.ccitbucket["bucket3may-2"]: Creation complete after 1s [id=ccit-bucket3may-2]
aws_s3_bucket.ccitbucket["bucket3may-3"]: Creation complete after 1s [id=ccit-bucket3may-3]
aws_s3_bucket.ccitbucket["bucket3may-1"]: Creation complete after 1s [id=ccit-bucket3may-1]
Apply complete! Resources: 3 added, 0 changed, 0 destroyed.
Created three buckets, with out any issue even duplicate because set will remove the duplicate
limitations

Tags
Tags :Main use of tags for all your resource metadata information about key-value like 
what is the which project,client who use like that information for undestanding 
Step1:
[ec2-user@ip-172-31-17-136 ccit]$ cat cloudinfra.tf
provider "aws" {
region = "eu-west-1"
}
resource "aws_s3_bucket" "ccitbucket" {
  bucket= "ccit-bucket3may-1"
  tags = {
  Name="CCITbucket"
  Env="dev"
  client="Zepto"}
}
[ec2-user@ip-172-31-17-136 ccit]$ terraform apply -auto-approve
Apply complete! Resources: 1 added, 0 changed, 0 destroyed.

Step2:See like below we can give tags for the resources

Step3: Same way you can use variables also, see here drawback number lines repeated to over come this issue use map
[ec2-user@ip-172-31-17-136 ccit]$ cat cloudinfra.tf
provider "aws" {
region = "eu-west-1"
}
resource "aws_s3_bucket" "ccitbucket" {
  bucket= "ccit-bucket3may-1"
  tags = {
  Name =var.ccittagname
  Env =var.ccittagenv
  client=var.ccittagclient }
}
variable "ccittagname"{
   default = "CCITbucket"
}
variable "ccittagenv"{
default = "dev"
}
variable "ccittagclient"{
default = "zepto"
}
[ec2-user@ip-172-31-17-136 ccit]$ terraform apply -auto-approve
Apply complete! Resources: 1 added, 0 changed, 0 destroyed.

Map
Used to pass both key and values to variables.
KEY-VALUE can also called as object or dictionary, it will save more line compared to above
[ec2-user@ip-172-31-17-136 ccit]$ cat cloudinfra.tf
provider "aws" {
region = "eu-west-1"
}
resource "aws_s3_bucket" "ccitbucket" {
  bucket= "ccit-bucket3may-1"
  tags = var.tags
}
variable "tags"{
  type = map(string)
  default= {
  Name ="CCITbucket"
  Env = "dev"
  client="zepto"
}
}
Created successfully bucket with tags 
[ec2-user@ip-172-31-17-136 ccit]$ terraform apply -auto-approve
Apply complete! Resources: 1 added, 0 changed, 0 destroyed.

 General info
 Practice terraform built-in-functions as far we used length(),upper()..
 Type of expression:variable expression, function expression, conditional expression, resource attribute
 
 Type of Block:
 Provider
 Resource
 Variables
 Output
 Locals
 Terraform 
Arguments: key value pair inside blocks ,which you have assigned variable values 
 ami="ami-04e7764922e1e3a57"
 instance_type="t2.micro"

 Terraform Advantage:
->Will support Multi cloud(Azure,aws,CGP,Kubernetes..etc)
->Modular & reusable code (which we use terraform module ,reusable complete project level, if you store you code .tf s3 bucket you can use any where in your code reusability)
->Declarative language(HCL Hashicorp  configuration language),easy to read and manage
->Support Infrastructure automation (Integrates with CI/CD pipelines (Jenkins,Github,Actions,..etc)
->Open-source & extensible( Free to use terraform cloud offering extra features,Can be extended with providers & plugin)
 Terraform Disavantage:
State file management issues
Learning HCL syntax 
Longer Execution time for large deployments(comparatively aws formation template ,aws templates has native)
Destroy command is dangers 

                           ---Thanks 


Friday, May 2, 2025

Terraform Lifecycle

 Terraform Lifecycle

Class 17th Terraform Lifecycle May2nd(Devops)
Terraform lifecycle(Create before destroy,prevent destroy,ignore changes)

Terraform modules( reusability/split the task to team wise)
Dynamic block(reduces the script)
Terraform locals
Variable precedence 
Collections(For loops,set,list,map)
Built-in functions
                                                Terraform Lifecycle
We can write the script in .tf file like block,resource block,output block,variable block..
if any one did unnecessary change how to prevent them.

Step1:You see here create first and then destroy instance 

[ec2-user@ip-172-31-20-61 CCIT]$ cat cloudinfra.tf
provider "aws" {

  region = "eu-west-1"
}

#resource "aws_s3_bucket" "ccitbucket"{
# bucket = "ccitbucketvsm2025"
#}

resource "aws_instance" "ccitinst"{
  ami =var.inst_ami
  instance_type="t2.micro"
  tags  = {
          Name="ccitinstance"
     }
          lifecycle{
             create_before_destroy=true
          }

}
variable "inst_ami" {}

[ec2-user@ip-172-31-20-61 CCIT]$ terraform apply -auto-approve -var="inst_ami=ami-09c39a45aca52b2d6"

Step2:it will destroy prevent from terraform script not from console level
[ec2-user@ip-172-31-20-61 CCIT]$ terraform  destroy -auto-approve -var="inst_ami=ami-09c39a45aca52b2d6"

  lifecycle{  

             prevent_destroy=true 

             }

Step3:it will  ignore changes while modify tag and ami if you adde 

 ignore_changes = [all] --not accept any change 

   lifecycle {

    ignore_changes = [tags,ami]
  }

Step4: sudo yam install tree ,it will give the file info of the folder 

[ec2-user@ip-172-31-17-136 ccit]$ tree 

.
├── cloudinfra.tf
├── terraform.tfstate
└── terraform.tfstate.backup

                                                     Terraform module 

Code reusability ,simply the code into file instead of dumping into main tf file ,split into each resources into separate modules all are .tf file only all information exist in the main tf file, best maintenance purpose used these module concept,each module will having separate plugins 

Root modules ,child modules

Step1:
[ec2-user@ip-172-31-17-136 ccit]$ cat cloudinfra.tf
provider "aws"{
  region = "eu-west-1"
}
resource "aws_vpc" "ccitvpc" {
cidr_block ="10.0.0.0/16"
tags ={
   Name ="CCITVPC"
  }
}

Step2: See all these resource single tf file ,it will grow rapidally, real time it was split separate .tf files 
[ec2-user@ip-172-31-17-136 ccit]$ cat cloudinfra.tf
provider "aws"{
  region = "eu-west-1"
}
resource "aws_vpc" "ccitvpc" {
cidr_block ="10.0.0.0/16"
tags ={
   Name ="CCITVPC"
  }
}
resource "aws_s3_bucket" "ccitbucket" {
 bucket = "ccitbucket-231"
}
resource "aws_instance" "ccitinst" {
 ami = "ami-04e7764922e1e3a57"
 instance_type="t2.micro"
 tags= {
   Name = "CCIT-INST"
 }
}
Module 
[ec2-user@ip-172-31-17-136 ccit]$ mkdir -p ./modules/vpc_module
[ec2-user@ip-172-31-17-136 ccit]$ mkdir -p ./modules/ec2_module
[ec2-user@ip-172-31-17-136 ccit]$ mkdir -p ./modules/s3_module
[ec2-user@ip-172-31-17-136 ec2_module]$ pwd
/home/ec2-user/ccit/modules/ec2_module
[ec2-user@ip-172-31-17-136 ec2_module]$ cat ec2infra.tf
resource "aws_instance" "ccitinst" {
 ami = "ami-04e7764922e1e3a57"
 instance_type="t2.micro"
 tags= {
   Name = "CCIT-INST"
 }
[ec2-user@ip-172-31-17-136 vpc_module]$ pwd
/home/ec2-user/ccit/modules/vpc_module
[ec2-user@ip-172-31-17-136 vpc_module]$ cat vpc_infra.tf
resource "aws_vpc" "ccitvpc" {
cidr_block ="10.0.0.0/16"
tags ={
   Name ="CCITVPC"
  }
}
[ec2-user@ip-172-31-17-136 s3_module]$ cat s3_infra.tf
resource "aws_s3_bucket" "ccitbucket" {
 bucket = "ccitbucket-231"
}

[ec2-user@ip-172-31-17-136 ccit]$ tree
.
├── cloudinfra.tf
├── modules
│   ├── ec2_module
│   │   └── ec2infra.tf
│   ├── s3_module
│   │   └── s3_infra.tf
│   └── vpc_module
│       └── vpc_infra.tf
├── terraform.tfstate
└── terraform.tfstate.backup

4 directories, 6 files
[ec2-user@ip-172-31-17-136 ccit]$ cd ..
[ec2-user@ip-172-31-17-136 ~]$ cd ccit
[ec2-user@ip-172-31-17-136 ccit]$ cd modules
[ec2-user@ip-172-31-17-136 modules]$ tree
.
├── ec2_module
│   └── ec2infra.tf
├── s3_module
│   └── s3_infra.tf
└── vpc_module
    └── vpc_infra.tf

3 directories, 3 files
[ec2-user@ip-172-31-17-136 modules]$ cat /ccit/cloudinfra.tf
cat: /ccit/cloudinfra.tf: No such file or directory
[ec2-user@ip-172-31-17-136 modules]$ cat /ccit/cloudinfra.tf
cat: /ccit/cloudinfra.tf: No such file or directory
[ec2-user@ip-172-31-17-136 modules]$ cat   /home/ec2-user/ccit/cloudinfra.tf
provider "aws"{
  region = "eu-west-1"
}

module "vpc" {

   source ="./module/vpc_module/"
 }

module "s3" {
  source ="./module/s3_module/"

}

module "ec2" {
   source ="./module/ec2_module/"
}

[ec2-user@ip-172-31-17-136 ccit]$ terraform apply -auto-approve
│ Error: Module not installed
│   on cloudinfra.tf line 15:
│   15: module "ec2" {
│ This module is not yet installed. Run "terraform init" to install all modules required by this configuration.

Step 3: 
[ec2-user@ip-172-31-17-136 ccit]$ terraform init
Initializing the backend...
Initializing modules...
Initializing provider plugins...

Step4: Successfully create vpc,ec2 and bucket
[ec2-user@ip-172-31-17-136 ccit]$ terraform apply -auto-approve
module.ec2.aws_instance.ccitinst: Creating...
module.vpc.aws_vpc.ccitvpc: Creating...
module.s3.aws_s3_bucket.ccitbucket: Creating...
module.s3.aws_s3_bucket.ccitbucket: Creation complete after 1s [id=ccitbucket-231]
module.vpc.aws_vpc.ccitvpc: Creation complete after 2s [id=vpc-05605cbdad34a41c9]
module.ec2.aws_instance.ccitinst: Still creating... [10s elapsed]
module.ec2.aws_instance.ccitinst: Creation complete after 12s [id=i-093279d54f60bf4d5]

Apply complete! Resources: 3 added, 0 changed, 0 destroyed.

Step5:
[ec2-user@ip-172-31-17-136 ccit]$ terraform  destroy -auto-approve

Destroy complete! Resources: 3 destroyed.

Step6: Source which is we called  source="./module/vpc_module/", given local path instead of that 
we can store the file in s3 bucket and call public url.
Created one sample bucket , Added vpc script file  and uploaded 
Step7: Given all permission of the bucket refer below s3 bucket permission 
https://oracleask.blogspot.com/2025/04/class-8th-s3-storage-service-simple.html
Public url:https://ccitsamplebucket123.s3.eu-west-1.amazonaws.com/vpc_infra.tf

after change cloudinfra path to url getting error you need again terraform init 

[ec2-user@ip-172-31-17-136 ccit]$ terraform  apply -auto-approve
│ Error: Module source has changed
│   on cloudinfra.tf line 8, in module "vpc":
│    8:    source ="https://ccitsamplebucket123.s3.eu-west-1.amazonaws.com/vpc_infra.tf"
│ The source address was changed since this module was installed. Run "terraform init" to install all modules required by this
│ configuration.

[ec2-user@ip-172-31-17-136 ccit]$ terraform init
Initializing the backend...
Initializing modules...
Downloading https://ccitsamplebucket123.s3.eu-west-1.amazonaws.com/vpc_infra.tf for vpc...
│ Error: Failed to download module
│   on cloudinfra.tf line 6:
│    6: module "vpc" {
│ Could not download module "vpc" (cloudinfra.tf:6) source code from
│ "https://ccitsamplebucket123.s3.eu-west-1.amazonaws.com/vpc_infra.tf": error downloading
│ 'https://ccitsamplebucket123.s3.eu-west-1.amazonaws.com/vpc_infra.tf': no source URL was returned

Step8: We can directly file put into zip file 
Step9: after changes 
   source ="s3::https://ccitsamplebucket123.s3.eu-west-1.amazonaws.com/vpc_infra.zip"
[ec2-user@ip-172-31-17-136 ccit]$ terraform init
Initializing the backend...
Initializing modules...
Downloading s3::https://ccitsamplebucket123.s3.eu-west-1.amazonaws.com/vpc_infra.zip for vpc...
- vpc in .terraform/modules/vpc
Initializing provider plugins...
- Reusing previous version of hashicorp/aws from the dependency lock file
- Using previously-installed hashicorp/aws v5.97.0
Step10:
[ec2-user@ip-172-31-17-136 ccit]$ terraform  apply -auto-approve
Apply complete! Resources: 3 added, 0 changed, 0 destroyed.
Bucket created,Ec2 created,VPC created


 Module sources(http,urls,s3bucket,local)


                                                          Dynamic block
Dynamic block in terraform a powerful feature that allow for the dynamic generation of nested blocks within resource , redundancy will reduce , just like for loop print 10,instead print 10 time

Step1: 
[ec2-user@ip-172-31-17-136 ccit]$ cat cloudinfra.tf
provider "aws"{
  region = "eu-west-1"
}


# Create a VPC with CIDR block 10.0.0.0/24
        resource "aws_vpc" "CCITVPC" {
          cidr_block           = "10.0.0.0/25"
          enable_dns_support   = true
          enable_dns_hostnames = true
          tags = {
                Name = "CCITVPC"
          }
        }
resource "aws_security_group" "CCIT_SG" {
          vpc_id = aws_vpc.CCITVPC.id
          name   = "CCIT SG"
  # Ingress rules defined manually
          ingress {
                from_port   = 443
                to_port     = 443
                protocol    = "tcp"
                cidr_blocks = ["0.0.0.0/0"]
 }

  egress {
                from_port   = 0
                to_port     = 0
                protocol    = "-1"
                cidr_blocks = ["0.0.0.0/0"]
          }
        tags = {Name = "CCIT SG"
          }
        }
Step2:
[ec2-user@ip-172-31-17-136 ccit]$ terraform apply -auto-approve
Apply complete! Resources: 2 added, 0 changed, 0 destroyed.


Step3: See above security port open 443 ,if any open asked 80..reusability
ingress {
    from_port   = 80
    to_port     = 80
    protocol    = "tcp"
    cidr_blocks = ["0.0.0.0/0"]
 }

Step4: Dynamic blocks using locals 
[ec2-user@ip-172-31-17-136 ccit]$ cat cloudinfra.tf
provider "aws" {
  region = "eu-west-1"
}
locals { #collections
  ingress_rules = [
    { port = 443, protocol = "tcp" },
    { port = 80, protocol = "tcp" },
    { port = 22, protocol = "tcp" },
    { port = 389, protocol = "tcp" }
  ]

}

# Create a VPC with CIDR block 10.0.0.0/24
resource "aws_vpc" "CCITVPC" {
  cidr_block           = "10.0.0.0/25"
  enable_dns_support   = true
  enable_dns_hostnames = true
  tags = {
    Name = "CCITVPC"
  }
}

resource "aws_security_group" "CCIT_SG" {
  vpc_id = aws_vpc.CCITVPC.id
  name   = "CCIT SG"
  # Ingress rules defined manually

  dynamic "ingress" {

    for_each = local.ingress_rules
    content {
      from_port   = ingress.value.port
      to_port     = ingress.value.port
      protocol    = ingress.value.protocol
      cidr_blocks = ["0.0.0.0/0"]
    }

  }


  egress {
    from_port   = 0
    to_port     = 0
    protocol    = "-1"
    cidr_blocks = ["0.0.0.0/0"]
  }
  tags = { Name = "CCIT SG"
  }
}

[ec2-user@ip-172-31-17-136 ccit]$ terraform apply -auto-approve
Apply complete! Resources: 0 added, 1 changed, 0 destroyed.

Step4: see here Dynamic block script added remaining port 22,389, reusable only single line adding , if required new port next time onward. 
 { port = 389, protocol = "tcp" }..etc

 { port = 8080, protocol = "tcp" }


                                                                  --Thanks


Thursday, May 1, 2025

Terraform Debugging

Terraform Debugging
Class 16th Terraform Debugging May 1st(Devops)
Terraform Debugging
Terraform state 
depends and parallelism 

Debugging help understand the issue (like misconfiguration or dependency error can occur) and fix them efficiently
 Trace log need set give the log it will store into log file 
Stages:TRACE,DEBUG,INFO,WARN,ERROR
export TF_LOG=TRACE 
export TF_LOG_PATH="log.txt"
terraform apply
Unset 
unset TF_LOG
unset TF_LOG_PATH
Stages


Step1: log file create current directory
[root@ip-10-0-1-221 ~]# sudo yum install -y yum-utils shadow-utils
Loaded plugins: extras_suggestions, langpacks, priorities, update-motd
Package yum-utils-1.1.31-46.amzn2.0.1.noarch already installed and latest version
Package 2:shadow-utils-4.1.5.1-24.amzn2.0.3.x86_64 already installed and latest version
Nothing to do
[root@ip-10-0-1-221 ~]# sudo yum-config-manager --add-repo https://rpm.releases.hashicorp.com/AmazonLinux/hashicorp.repo
[root@ip-10-0-1-221 ~]# sudo yum -y install terraform
[root@ip-10-0-1-221 ~]# mkdir ccit
[root@ip-10-0-1-221 ~]# vi cloudinfra.tf
[root@ip-10-0-1-221 ~]# cat cloudinfra.tf
provider "aws" {
region="eu-west-1"
access_key="AKIATFBMO7H4MQLOWPFY"
secret_key="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"
}
resource "aws_s3_bucket" "bucket" {
bucket ="ccitbucketerraform"
}
[root@ip-10-0-1-221 ~]# terraform init (All plugins downloaded in the directory)
[root@ip-10-0-1-221 ~]# terraform plan
[root@ip-10-0-1-221 ~]# terraform apply -auto-approve
Plan: 1 to add, 0 to change, 0 to destroy.
aws_s3_bucket.bucket: Creating...
aws_s3_bucket.bucket: Creation complete after 1s [id=ccitbucketerraform]

Apply complete! Resources: 1 added, 0 changed, 0 destroyed.

                         Script for Instance
provider "aws"{
region="eu-west-1"
access_key="AKIATFBMO7H4MQLOWPFY"
secret_key="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"
}
resource "aws_instance" "ccitinst" {
ami="ami-04e7764922e1e3a57"
instance_type="t2.micro"
subnet_id     = "subnet-0477e85088645156b"
}

Debugging  TRACE
[root@ip-10-0-1-221 ~]# export TF_LOG=TRACE
[root@ip-10-0-1-221 ~]# terraform apply -auto-approve
[root@ip-10-0-1-221 ~]# export TF_LOG_PATH="logs.txt"
[root@ip-10-0-1-221 ~]# export TF_LOG_PATH="logs.txt"
[root@ip-10-0-1-221 ~]# terraform apply -auto-approve

[root@ip-10-0-1-221 ~]# ls -lrt
total 1924
drwxr-xr-x 2 root root       6 May 29 17:06 ccit
-rw-r--r-- 1 root root     194 May 29 17:31 cloudinfra.tf
-rw-r--r-- 1 root root    2664 May 29 17:50 terraform.tfstate.backup
-rw-r--r-- 1 root root    2663 May 29 17:50 terraform.tfstate
-rw-r--r-- 1 root root 1957198 May 29 17:50 logs.txt

[root@ip-10-0-1-221 ~]# unset TF_LOG
[root@ip-10-0-1-221 ~]# unset TF_LOG_PATH

                                       Alias and Providers
-> In terraform, providers are responsible for managing and interacting with external service(like AWS,Azure,GCP,etc)
->Aliases allow you to define multiple configurations of the same provider within single terraform configuration,
What is a provider ?
A provider is a plugin that enables terraform to interact with an external service 
Provide "aws",Azure,GCP.. etc
What is use Alias?
The alias agruments allows multiple configuration of the same provider .This is Useful when:
 1.You can deploy resources in multiple  AWS regions,
2.You can deploy multiple aws accounts
3.You can deploy to different service providers.

CLI
AWS Service need communicate with server ,need provide access security key 
using aws console Iam user access key and security.
    
[root@ip-10-0-1-221 ccit]# aws configure
AWS Access Key ID [None]: AKIATFBMO7H4MQLOWPFY
AWS Secret Access Key [None]: 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
Default region name [None]: eu-west-1
Default output format [None]:
Access key stored in below file 
[root@ip-10-0-1-221 ccit]# vim ~/.aws/credentials

[ccitapr]
aws_access_key_id = AKIATFBMO7H4CHQFIBIT
aws_secret_access_key =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
[default]
aws_access_key_id = AKIATFBMO7H4MQLOWPFY
aws_secret_access_key = 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

[root@ip-10-0-1-221 ccit]# cat cloudinfra.tf
provider "aws" {
region="eu-west-1"
profile="default"
}

provider "aws" {
alias="prod"
region="eu-west-2"
profile="ccitapr"
}

resource "aws_s3_bucket" "bucket" {
provider =aws
bucket ="ccitbucketerrawest1"
}

resource "aws_s3_bucket" "euwestbucket2" {
provider =aws.prod
bucket ="ccitbucketerrawest2"
}
[root@ip-10-0-1-221 ccit]# terraform apply -auto-approve
Plan: 2 to add, 0 to change, 0 to destroy.
aws_s3_bucket.bucket: Creating...
aws_s3_bucket.euwestbucket2: Creating...
aws_s3_bucket.bucket: Creation complete after 1s [id=ccitbucketerrawest1]
aws_s3_bucket.euwestbucket2: Creation complete after 1s [id=ccitbucketerrawest2]

Apply complete! Resources: 2 added, 0 changed, 0 destroyed.

[root@ip-10-0-1-221 ccit]# terraform destroy -auto-approve


                               Terraform state file Lock 
Practical two session same server project , one terraform apply and other session terraform destroy. 

[root@ip-10-0-1-221 ccit]# terraform apply

[root@ip-10-0-1-221 ccit]# terraform destroy -auto-approve
│ Error: Error acquiring the state lock
│ Error message: resource temporarily unavailable
│ Lock Info:
│   ID:        aba92f57-ee31-0a44-9387-0e2f004f6dad
│   Path:      terraform.tfstate
│   Operation: OperationTypeApply
│   Who:       root@ip-10-0-1-221.eu-west-1.compute.internal
│   Version:   1.12.1
│   Created:   2025-05-29 20:32:11.65976967 +0000 UTC
│   Info:
│ Terraform acquires a state lock to protect the state from being written
│ by multiple users at the same time. Please resolve the issue above and try
│ again. For most commands, you can disable locking with the "-lock=false"
│ flag, but this is not recommended.

Once we apply confirm yes , we can destroy other session

                                             S3 and Dynamo DB Configuration
  • Add that block to existing code and run terraform init -upgrade
  • DynamoDB ->Create table ->Partition key :LockID ->create 
  • now after apply state file will go to s3 bucket 
  • dev-1 type destroy and dev-2 type apply now state file locked 
  • you can check lockid in new items of table 
  • Once destroy done for dev-1 state file will be unlocked and dev-2 can work 
Dynamo db is no sql database, Need create one table 
DynamoDB >Tables >Create table, LockID one partition key need to add 


Step2:Create one s3 bucket ccitbuckets3bucket and enbled versioning 
[root@ip-10-0-1-188 ccit]# aws configure
AWS Access Key ID [None]: AKIATFBMO7H4CHQFIBIT
AWS Secret Access Key [None]: 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
Default region name [None]: eu-west-1
Default output format [None]:
[root@ip-10-0-1-188 ccit]# aws configure list
      Name                    Value             Type    Location
      ----                    -----             ----    --------
   profile                <not set>             None    None
access_key     ****************IBIT shared-credentials-file
secret_key     ****************pRsC shared-credentials-file
    region                eu-west-1      config-file    ~/.aws/config
[root@ip-10-0-1-188 ccit]# vi cloudinfra.tf
[root@ip-10-0-1-188 ccit]# cat cloudinfra.tf
provider "aws" {
  region     = "eu-west-1"
  profile = "default"
}
terraform {
backend "s3"{
bucket = "ccitbuckets3bucket"
key = "ccit/terraform.tfstate"
region = "eu-west-1"
dynamodb_table = "terraformstate"
}
}

resource "aws_s3_bucket" "bucket" {
bucket ="ccitbucketerraform"
}
s3 related plugins are downloaded 
[root@ip-10-0-1-188 ccit]# terraform init -upgrade
Initializing the backend...

Successfully configured the backend "s3"! Terraform will automatically
use this backend unless the backend configuration changes.
Initializing provider plugins...
- Finding latest version of hashicorp/aws...
- Using previously-installed hashicorp/aws v5.99.1

Terraform has been successfully initialized!

[root@ip-10-0-1-188 ccit]# terraform apply -auto-approve
Plan: 1 to add, 0 to change, 0 to destroy.
aws_s3_bucket.bucket: Creating...
aws_s3_bucket.bucket: Creation complete after 1s [id=ccitbucketerraform]

Apply complete! Resources: 1 added, 0 changed, 0 destroyed.
S3 bucket created successfully


One state file created successfully

Step3:
[root@ip-10-0-1-188 ccit]# terraform destroy -auto-approve
Destroy complete! Resources: 1 destroyed

See here below screen shot bkp file created while destroy and existing versioning state file size very less.

Step4:
Dynamodb table one created terraform state file added 

After destroy again apply ,wait for while say yes
[root@ip-10-0-1-188 ccit]# terraform apply

Go to DynamoDB table again ,see below screen terraform state file locked sate
once apply change click 
Enter a value: yes
Apply complete! Resources: 1 added, 0 changed, 0 destroyed.
[root@ip-10-0-1-188 ccit]#
See lock released ,record cleared automatically

Step5: See here below terraform communicate,with dynomdb table and s3 bucket version
without terraform state file presents in the local 
[root@ip-10-0-1-188 ccit]# ls -lrt
total 12
-rw-r--r-- 1 root root 2664 May 31 03:54 terraform.tfstate.backup
-rw-r--r-- 1 root root  181 May 31 03:54 terraform.tfstate
-rw-r--r-- 1 root root  381 May 31 04:34 cloudinfra.tf
[root@ip-10-0-1-188 ccit]# rm -rf t*
[root@ip-10-0-1-188 ccit]# terraform apply -auto-approve
[root@ip-10-0-1-188 ccit]# ls -lrt
total 4
-rw-r--r-- 1 root root 381 May 31 04:34 cloudinfra.tf

                                                                       Parallelism
  • Terraform executes resource creation, updates and deletion in parallel whenever possible to speedup deployment.
  • However, it also respects dependencies between resouces,ensuring that dependent resources are processed in the correct order.
  • it will execute all the resources at a time, by default ,parallelism limit is 10
  • terraform apply -auto-approve -parallelism=1
Note it will application apply and destroy.

Dependency 
The depends on argument in terraform is used to explicitly define dependencies between resources. This ensures that one resource is created ,updated or destroyed only after another resource has been properly handled.
  we use "depends_on" keyword to implement explicit dependency 
Why use depends_on?
Terraform automatically determines dependencies between resource based on references.
However, in some cases, dependencies are not directly referenced, and terraform may try to create resource in parallel 
A resource doe not have a direct reference but must still wait for another resource.
There are implicit dependencies, like provisioning network resources before instances.
A resource need to be updated only after another has changed

Step1:
Previous dynamodb storing s3,migrate-state store tfstate locally 

[root@ip-10-0-1-188 ccit]# terraform init -migrate-state
Successfully unset the backend "s3". Terraform will now operate locally.
[root@ip-10-0-1-188 ccit]# terraform apply -auto-approve
Apply complete! Resources: 2 added, 0 changed, 0 destroyed.

[root@ip-10-0-1-188 ccit]# cat cloudinfra.tf
provider "aws" {
  region     = "eu-west-1"
  profile = "default"
}

resource "aws_instance" "instone" {
ami="ami-04e7764922e1e3a57"
instance_type="t2.micro"
subnet_id     = "subnet-0477e85088645156b"
 count = 2

tags = {
 Name = "ccit${count.index}"
}
}
See below two instance initializing same time 


[root@ip-10-0-1-188 ccit]# ls -lrt
total 16
-rw-r--r-- 1 root root  256 May 31 05:58 cloudinfra.tf
-rw-r--r-- 1 root root 9355 May 31 05:59 terraform.tfstate
Step2:
[root@ip-10-0-1-188 ccit]# terraform destroy -auto-approve

Step3: see after apply parallelism creating one after another instances 
[root@ip-10-0-1-188 ccit]# terraform apply -parallelism=1


Step4: if i add s3 bucket in the same script first s3 bucket will create, after instance will create,
so can make put some dependency instance need create first and then create s3 bucket , wait for completion of instance creation.

 [root@ip-10-0-1-188 ccit]# cat cloudinfra.tf
provider "aws" {
  region     = "eu-west-1"
  profile = "default"
}

resource "aws_instance" "instance" {
ami="ami-04e7764922e1e3a57"
instance_type="t2.micro"
subnet_id     = "subnet-0477e85088645156b"
 count = 2

tags = {
 Name = "ccit${count.index}"
}
}
resource "aws_s3_bucket" "bucket"{
bucket ="ccitbucketdependent"
depends_on =[aws_instance.instance]
}
with above script Instances created first and then s3 bucket create, Please check timeframe below
Instances and s3 bucket 
[root@ip-10-0-1-188 ccit]# terraform apply -auto-approve

S3 bucket created 12.3. 44 seconds after two instance create above 


--Thanks